Insurgency Sandstorm: Strategy & Tactics
Advantages, disadvantages, and countermeasures
GUIDE > FPS > INSURGENCY-SANDSTORM
by
Pijove

Posted on October 12, 2022
Hello everyone,
What I like about strategy and tactics is that they both have advantages, disadvantages, and countermeasures, which adds a whole new level of complexity and makes for interesting games. Although this is a long post, I begin with some fundamental abstract concepts before moving on to real in-game examples (Images & Video). Parts that you already know or don’t find interesting can be skimmed or skipped.
The 3 main parts:
1) Strategy, Tactics & Rationale overview 2) INS:SS specific comments 3) Game examples
Strategy, Tactics & Rationale
Both terms Strategy and tactics are used interchangeably but the way I understand them is:
- Strategy = What do you want to do?
- Tactic = How are you going to do it?
- Rationale = Why are you doing it?
I also added “rationale” since it clarifies the process of problem-solving. Why are you using this tactic and why is this your strategic objective? If you only have strategies, you know what you want to achieve but do not how to do it. If you only have tactics, you know how to do an action but do not know when they are appropriate.
Common Strategies/ tactics:
To achieve the goal, you may attempt to execute certain strategies or tactics. This is not a complete list, just some brief ideas to think about. Is the pace of battle going to be fast or slow? Are your forces going to be concentrated or divided? Are you going to use orthodox or unorthodox tactics? Once you know what you intend to do, you can optimise your loadout accordingly for the intended role.
By Pace
Rushing / Blitz
Rushing combines speed and surprise to disorient the enemy before they can mount a successful defence.
Pressure / Siege / Attrition
In terms of pace and speed, “pressure” is what I would refer to as the opposite of “rushing.” Siege or attrition are two similar phrases. In essence, you keep exerting “pressure” on the opposition and wear them down via attrition. You might do this by gradually strengthening your position or by continuing to kill enemies who are close to or on the objective. Once the enemy has been sufficiently pressured, you can defeat them and complete the goal.
By Movement
Frontal Assault
A frontal assault is a direct, full-force strike on the opposing force’s front line as opposed to its flanks or rear. Frontal assaults may be costly, even if successful, and sometimes disastrously costly if failed since they expose the attackers to the enemy’s strongest defences. This allows for a swift and decisive victory but comes at the expense of exposing the attackers to this strength.
Flanking
Suppose the opposition team is a single, directional object. Attacking from the sides is known as flanking. Flanking is advantageous since it prevents the enemy from concentrating on engaging you head-on. An action that involves flanking simultaneously from both sides is referred to as a “pincer”.
Encirclement
Encirclement is when a force or target is isolated and surrounded by enemy forces. The situation is highly dangerous for the encircled force. At the strategic level, it cannot receive reinforcements as they are cut off.
Chokepoint
A choke point is A use of strategic geography, usually in a narrow area, intended to concentrate the enemy into a confined area where the defender can maximize his forces.
By Deception
Ambush
An ambush is a tactic in which a combatant uses an advantage of concealment or the element of surprise to attack unsuspecting enemy combatants from concealed positions.
Feint
An offensive action involving force-on-force contact with the adversary which deceives the adversary as to the location and/or time of the friendly side’s main effort. A feint will cause the enemy to concentrate resources at an incorrect time and location. A series of feints will condition the enemy to friendly activities in the same location, causing the enemy to lower their guard or respond ineffectively to the friendly main effort.
Ruse
The deliberate exposure to the enemy of false information that causes the enemy to reach an incorrect conclusion about friendly intentions and capabilities.
Insurgency: Sandstorm Specific
Winning conditions (Ultimate Strategic Goal)
The ultimate strategic goal is what is required for the win conditions. The game mode you play determines it.
In Push as a defender, you need to eliminate the enemy waves & keep the objective safe until time runs out. For the attacker, you need to secure a series of objectives (including the cache), or eliminate defenders*. The in-game tip says “Play the objective”, which I interpret as - are your actions helping the team, achieve the objective?
Why is defending easier than attacking in Push?
In the “Push “game mode, defending is considered easier than attacking, Why?
- Both teams have the same weapons & equipment.
- Attackers have access to stronger fires support (Minigun, Gunship, Rocket Barrage)
So where does the advantage for the defender exist? The advantage that defenders have come from the winning conditions (Ultimate Strategic Goal)
- If time runs out: The defence wins
- If both teams play it like Team Death Match: The defence wins
Attackers can only win by completing the objectives. Attackers must move towards the defenders to capture the objective.
Replay Mode
Watching replay mode is a great source of information. Occasionally you should rewatch your matches. It doesn’t need even to be in First Person View. Switch to “free camera” turn on the “Outline” and just follow things that interest you.
Good teams vs Bad teams
Without going deep into analysing a replay. If one team crushes another team it will highlight what worked and what did not work. If you watch a few of these, you will see some patterns emerge. The team with better teamwork will likely win. It is difficult for a single player to carry a whole team to victory. Teams that use fire support well will have an edge over those that do not, so a good commander/observer combo is very helpful for the team.
Defenders:
- Will position themselves in strong positions to counter attackers or defend the objective.
- Distributed appropriately so there are no major weaknesses in the defensive line.
- Will know how to react when an objective is being captured.
Attackers:
- Can attack as a team, and exploit weaknesses
- Moves with purpose
- Knows how to clear and hold an objective.
Securing the objective effectively as an attacker:
An effective way to capture the objective is to have multiple players on the objective as this reduces the time required to secure it. The shorter the time on the objective is, the less vulnerable you are to a counterattack and having an enemy present to block the capture.
Communication
One of the strongest actions you can help your team is by communicating important information. This doesn’t mean chattering all the time or micromanaging players as that would be both distracting and annoying. Before talking consider:
- Is this information important?
- Is it appropriate to communicate it now?
- Can I communicate it clearly and concisely?
If you were killed by a sniper on the left, when you respawn, you may inform the team of that information as it could save their lives. There is an appropriate time to communicate, if you’re being stealthy you do not want to give audio cues or reveal plans to the enemy. If someone else is talking that is going to create noise and both of you won’t be heard correctly. Try your best to reduce information to be short and sharp, as players are focusing on other things while you are talking.
Communication near the enemy:
When near the enemy they can listen to you also. So you need to be very careful what you communicate. I tend to not talk unless in my judgement that the information I will transmit will have more benefit to the team than the enemy. An example scenario: As part of 3 Attackers on the objective with 1 enemy blocking. I may communicate:
- “Objective blocked”
- “Bottom floor clear”
- “Enemy, top floor”
Note I’m not revealing too much information. Even when I say “Bottom floor clear”, yes it reveals that I’ve checked the bottom floor and likely still there, but it doesn’t state my next movements. Am I going to hold the bottom floor? Or am I going to clear the top floor?
Game Examples
I’m going to give 4 main game examples as a rough idea. There are many more strategies and tactics you can implement. The reason it appears as a long “script” is I wanted the reader to have insight into the thought process of what was happening at the time.
- Simple Smoke Screen (Image)
- Command and Conquer: Shock and Awe (Video)
- Tactical Espionage Action (Video)
- Commander Clutch (Video)
Simple Smoke Screen
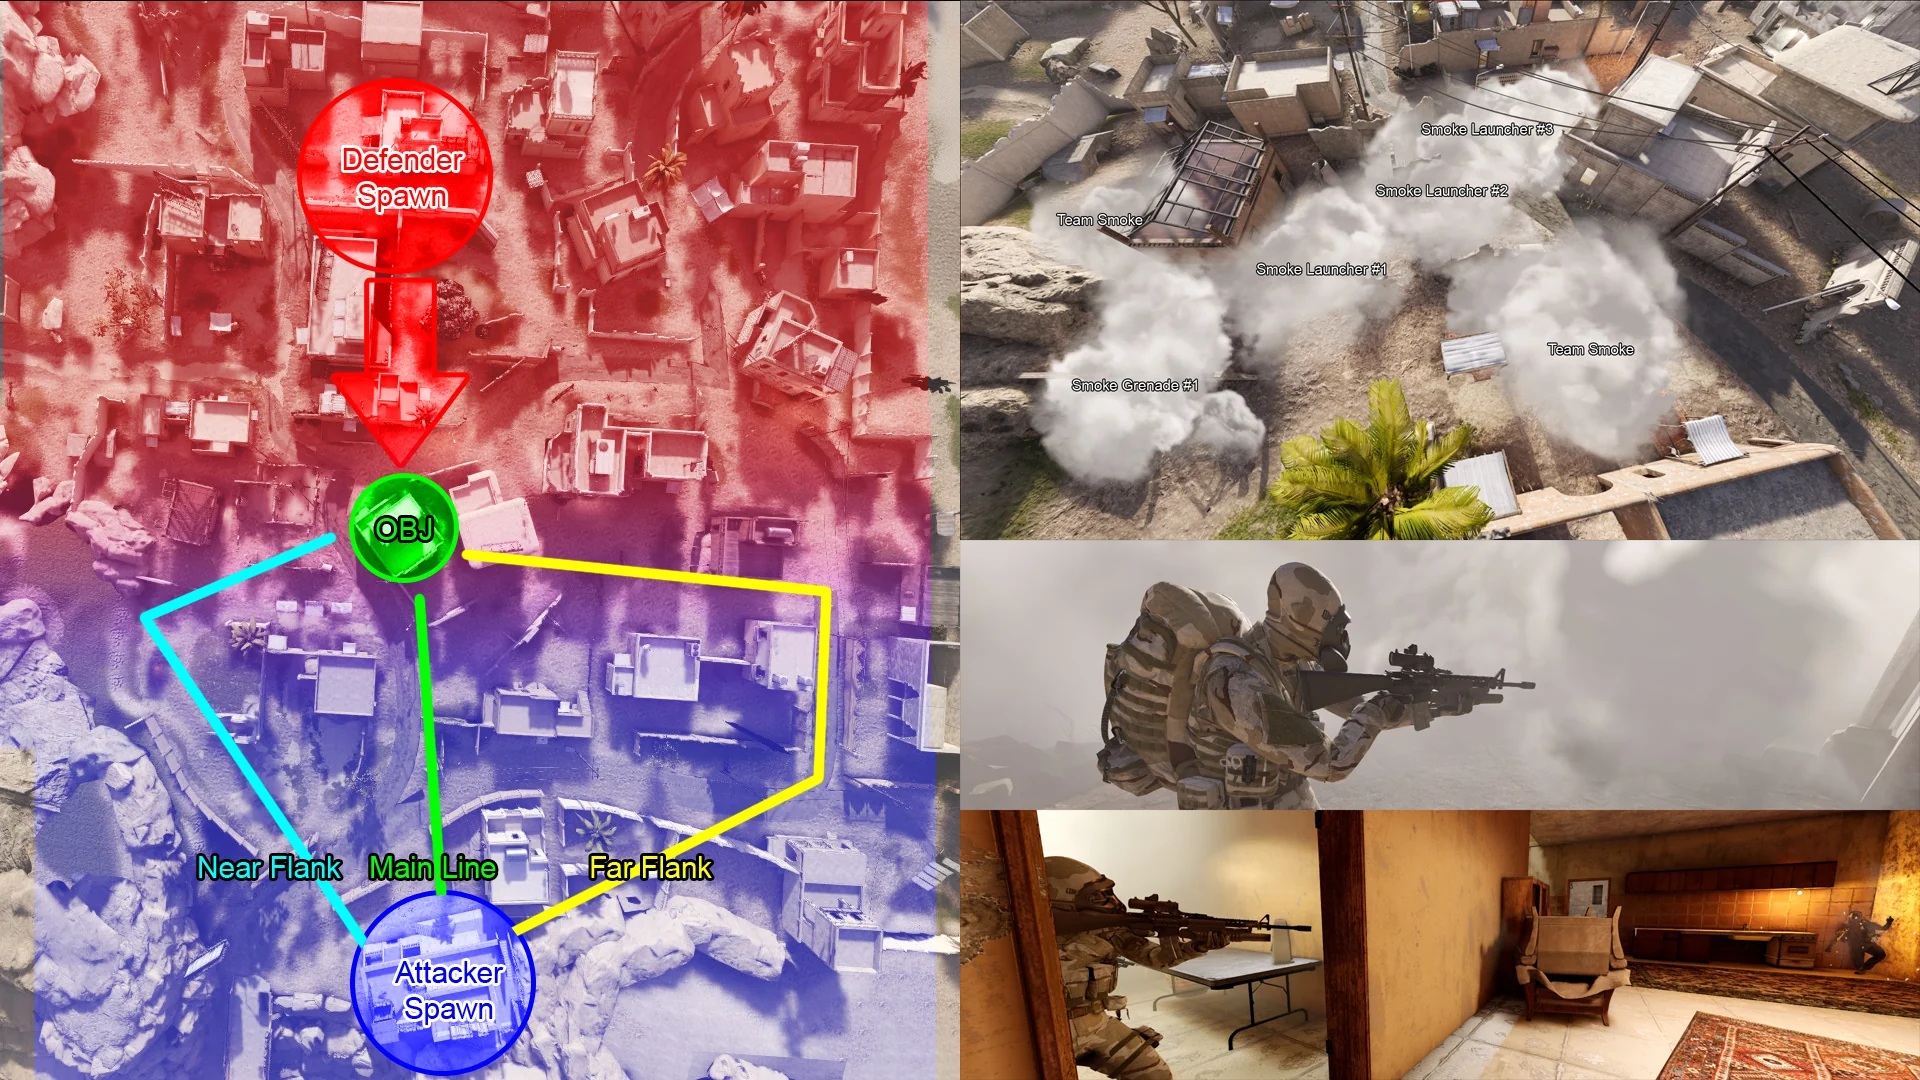
Push » Hideout » Security » Attacking » B (2 variations)
Using a smokescreen before an attack is a very common tactic. The purpose of this tactic is to create concealment to enable safer movement towards the objective. I’m using a couple of images as they can help explain the map as paths, the smokescreen I created and the different approaches to capturing the same objective.
Version 1 (Fig.) is a neater execution of the smoke tactic as I create a nice path of concealment with 4x smoke. Neither version is better than the other. Depending on how the game unfolds will help determines what are the best actions to take. There are multiple ways to secure the same objective (Fig.).
Path Finding
When looking at a map you can generalise and divide it into 3 main paths. There are more than 3 paths but you can blend them into a spectrum.
- Main / Direct (Shortest distance path, Most direct path)
- Near Flank (Medium distance path, closest flank from the spawn)
- Far Flank (Longest distance path, furthest flank from spawn)
Each path has its advantages and disadvantages. Context is important too. For example, if your team has already cleared a path to the objective, and needs support urgently, the main line would seem most appropriate, factors like this need to be taken into consideration too. The main line will likely have more enemies while the far flank should have fewer as an area of lesser interest due to distance away from the objective.
Plan Overview
- Get close to the objective (strategic positional goal)
- Create a path of concealment using smoke (tactical goal)
- Get on the objective (strategic positional goal)
- Clear the objective of enemies using M16A4/Frag grenade (tactical goal)
Version 1 (Left Flank)
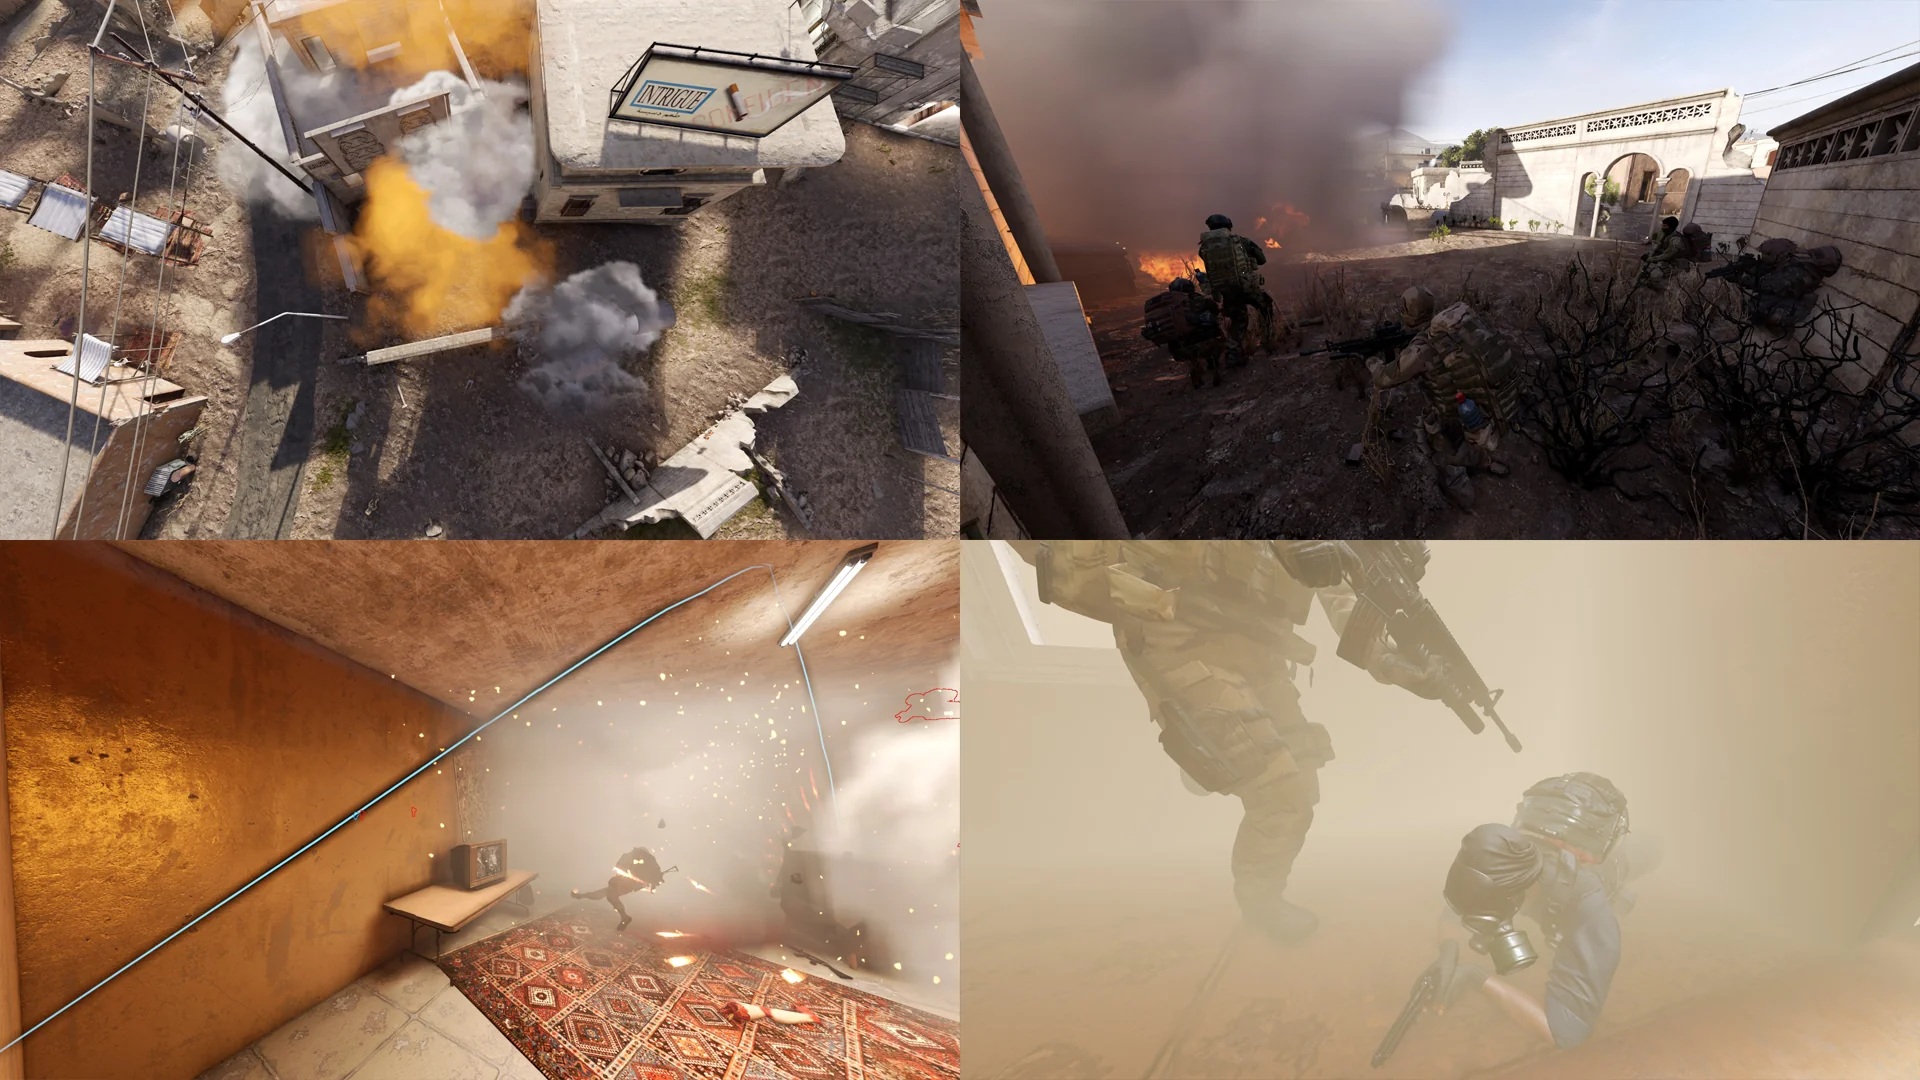
My rationale for this was I wanted to use my smoke closer to the objective: I felt I could move near the objective safely without smoke cover (1). When I am near the objective, it will be more dangerous and that is when I would like to use my smoke for concealment (2). I didn’t want to waste the opportunity that the smoke created so I needed to move too (3). I didn’t need to clear the objective, but I didn’t want to wait in the small room and potentially be attacked from 2 sides, so by clearing the bottom floor I had more information (4).
Version 2 (Main)
I did a variation where I wanted to clear the objective first. (Reordered: 1,2,4,3) essentially acting like a transposition as the start and finish were the same.
“In chess, a transposition is a sequence of moves that results in a position which may also be reached by another, more common sequence of moves.”
Objective Clearing
Version 1
Immediately when the objective capture was triggered the state was “stalemate”, this reveals a lot of information. There are only 2 rooms for capturing, and only 4 logical places the enemy could be hiding.
- Small Room (I entered)
- Window corner (right)
- Window corner (left)
- Stairs
As the enemy was camping in that room, I expected them to figure out rapidly that I must be in the small room. Usually, I like clearing with a frag, but this time I felt I needed to take the initiative and act quickly. I cleared both the small room, and the right corner, So I expected the enemy to my left, or stairs. I slice the angle so I can check the corner and not expose myself to the stairs. I manage to eliminate them before they get me. 2 other teammates join to speed up the capture rate, with random firefights occurring nearby. The next enemy wave is too slow to contest it. Objective captured, a strategy goal accomplished.
Version 2
I used a frag grenade to clear the main room. I enter the main door and pre-emptively checked upstairs if there was an enemy, so they wouldn’t counterattack when the objective is being captured. 3 more teammates assisted it in capturing the objective rapidly.
Smoke Counter?
- Smoke attracts attention
- Smoke has a limited duration
- Smoke is ONLY concealment NOT cover
If there is a large build-up of smoke you can expect an attack to happen soon. Random shots, or throwing frag grenades into the smoke can deter the enemy to advance or may pick up random kills. If you can stall the attack long enough the smoke will disappear negating the smoke tactic.
Command and Conquer: Shock and Awe Rush
Push » Crossing » Security » Attacking » All Objectives
This round felt more like an action movie as objectives A, B & C were all captured in a single life. The initial plan was to rush A with multiple players using the vehicle. Our team had momentum so we keep rushing. Which resulted in a quick round as the total elapsed time was 7min 19s. I was fortunate I had a great team.
Objective A
I jump out of the car, as I was concerned about that player (eliminated) sneaking back and eliminating our car rush. I use my 4x smoke to create a smoke screen. I saw the enemy with the PKM when I was running, so I lay prone at an awkward angle to force him to move. I move again and this time I’m shot at, I keep calm and try to remain covered so I can keep capturing the objective, which worked as we secured A. I managed to pick off another defender which hasn’t retreated yet.
Objective B
I decide to call in a gunship and use the car. Credit the driver for being patient and waiting for the helicopter to make an initial strike so it would be less likely that the car would be destroyed or ambushed en route. The gunship manages to eliminate 4 players before we arrive at the objective. The gunner of the vehicle manages to eliminate an enemy too. Extremely aggressive rush from the 5 of us in the car, 2 go up the stairs and take the top floor. The others enter the building from the rear, where one of our players eliminated a demolition player.
Objective C
I initially wanted to rearm my smokes etc, but my observer was near and knew we could keep the momentum going, so I call in a minigun and decide to the use car again. Our team was still pushing aggressively. I drove myself and 2 other players to C, where and managed to assist in the capture of C. The gunner of the vehicle manages to eliminate an enemy. The minigun eliminated 3 players during the capture of C.
Cache:
I continue to check downstairs as I suspected an enemy may want revenge on our capture or to get cover from the helicopter. I managed to use the M16A4 to eliminate a player. The Minigun continued to shred an additional 8 enemies, eliminating 11 in total before leaving. The total fire support kills from both helicopters was 15!
Helicopter Counter?
The security helicopter fire support can be destroyed. The simplest way is to hit it with a single RPG. The is an expectation if you’re playing demolition on defence as an insurgent, you need to deal with the helicopters. Every class can use their primary weapon to destroy the helicopter too, small arms hitting the rotor blade are most effective, if not, the sheer volume of damage can destroy a helicopter too.
You don’t have to fight the helicopter, smoke can block the helicopters from targeting you. Which is very helpful if you need to move. If you don’t have smoke grenades to use, just be ready to position yourself in cover when the helicopter does arrive.
Tactical Espionage Action
Push » Crossing » Insurgent » Attacking » B & C
Plan
My initial plan is to go to the far flank, eliminate any snipers, that were shooting at our main line, and then approach the objective from the flank. I wanted to play “Stealthy”. I’m a big fan of the Metal Gear Solid series (tactical espionage action), so there is a transfer of tactics from there.
My loadout had an emphasis on mobility (Weight=23%), so I purposely didn’t use a carrier which meant I would only have 3 magazines. My Primary was a Suppressed AKS-74U with a 4x-1x Optic. The suppressor was used as didn’t want to reveal my location due to sound. Note how quiet 5.45mm (&5.56mm) are when suppressed in comparison to larger-calibre suppressed weapons. The 4x-1x optic so it could engage in both long-range and close-range combat. I have no smoke grenades for concealment, so I need to be more cautious in my movement.
Objective B
I start the video by illustrating the importance of audio cues. The enemy sniper was focused on shooting our main line, but then they hear footsteps and immediately react. The footsteps were my teammate who was ruining my stealth approach as I as silently walked towards the building to clear it. The enemy sniper eliminates my teammate, and I eliminate the enemy (#1, 4m) when he is Tea-Bagging the corpse. I continue to clear the building as I don’t know if that is the only enemy.
When the building was clear, I quickly scan the enemy hill to see if there is a sniper, there is so I eliminate them (#2, 191m). If continue with my original plan and continue to flank, where I target the enemy with full auto (#3, 27m). We capture ‘B’ shortly after.
Objective C
Objective ‘C’ can be a nightmare to capture, my next plan was to try and get an early positional advantage, then increase pressure on the enemy to allow my team to move easier, whilst trying to reduce the distance to the objective, before attempting to capture it.
Since I’m fast after the ‘B’ Capture, I manage to find an enemy who hasn’t fallen back likely trying to ambush (#4, 100m).
I make it to a decent position, where I plan to do scanning from. I spot and eliminate someone behind the objective (#5, 104m). I’m still trying to remain vigilant as many teammates are dying, and I don’t know where. I managed to spot a sniper far away and I take a single shot (#6, 221m). I keep scanning this time back to the objective and see an enemy aiming across the map and they get eliminated (#7,110m) and very shortly after, an enemy is trying to watch this flank and they get eliminated (#8, 116m) also note my teammate’s M99 kill that sends the enemy at the objective flying.
At this point I wasn’t happy with the teams’ positional progress it seemed like a bit of a stalemate. We didn’t even have a commander and we were not using smoke effectively, just seemed a bit like a large TDM. Also, I was conscious of time and wanted to move forward. I decided to sprint towards the bush, even though it is not stealthy I sensed I was going to be noticed anyway and if I was crawling and I would be an easy target. My and teammate both make it to the bush while under fire, and this is a key distinction in how we both reacted. Since I didn’t know the origin of the shooter, I decided if I hid for a short period, the enemy would assume I’m dead and shift their focus elsewhere. My teammate immediate reacted by trying to counter which didn’t well for him, and afterwards the enemy shooting in my general direction either to kill me or to get me to react (so they can kill me). I stay disciplined and don’t react. Even the enemy vehicle sprays my location too. Unfortunately, there isn’t a clear shot at the gunner. Eventually, things calm down (took around 60s), I managed to spot another sniper and eliminate them (#9, 211m). I still suspect an enemy is watching this flank near ‘C’ and I am correct and managed to eliminate them (146m).
At this point, I am extremely conscious about time, and I am finally about to make a break and get close to the objective from the right flank. I remain cautious as I expected to see some snipers on the hill, but couldn’t see any. I do manage to sneak up on pair of enemies on the 1st floor of the objective (#11 24m, #12 21m).
I managed to start the capture of the objective with only 8 seconds left! I decided to lurk near the enemy door entrance as I didn’t want to get into a stalemate/blocked objective and would rather lose to a gunfight that get bogged down and surrounded. I hear an enemy sprinting towards the objective and guessed correctly they would come through the door (#13, 5m) and finally I manage to take out another enemy on the stairs trying to look in (#14, 9m). at that point, 2 other teammates assist in the capture and we manage to secure it before the next enemy wave arrives.
Video Summary
- Importance of audio cues. The enemy sniper reacts correctly to my noisy teammate
- Don’t need lots of ammo, I used the minimum (3x magazines)
- Smoke is great, but it is not the only tool, whole video I don’t use smoke once.
- Positioning: I was trying to constantly improve my position, but circumstances determine the pace.
- Pressure: Opposite tactic to a “rush” you can form a slow noose around the enemy and eventually get the objective.
- Engagement Ranges: CQC & Counter-Sniping:
| Firing Mode | Eliminations (n) | Min Range |
Max Range |
Average Range |
|---|---|---|---|---|
| Semi-Auto | 10 | 21m | 221m | 124m |
| Automatic | 4 | 4m | 27m | 11m |
Pressure Counter?
To counter pressure, you need to prioritize specific goals like a sequential puzzle. At the start of the video, the enemy sniper was applying pressure against our attack. That sniper was a high-priority target as he was sabotaging our attacks. When that sniper was eliminated, it allowed my team to attack better which meant the objective could be secured.
Commander Clutch: The Good, The Bad and The Ugly
Push » Tideway » Insurgent » Attacking » All Objectives
In this example, I show the full round, to illustrate the good the bad and the ugly of what happened, as things do not always go to plan.
Objective A
Initially, I was playing rifleman. We did have a commander, but they quit before A was captured. Anyway, I was too slow attacking the flank and our team captured A with 0 waves left. I noticed we still had an observer so I would switch to commander when I died.
Objective B (The Good)
This objective can be annoying to approach, so when I respawned as commander, I wanted to both remove enemies at the objective and create a lot of smoke before committing to an attack. I wanted to use the rocket barrage to eliminate enemies and deter them from being near the objective.
To keep it concise, I let the team know the rough plan:
“Rocket Barrage near B don’t push yet. I will spam smoke after.”
The rocket barrage softened the objective by killing 3 enemies. I spammed smoke (x4) creating a line across the front of the objective so the team and I could approach it.
I decide to go up the stairs to capture it as I highly doubt that would be an enemy there due to the recent rocket barrage. Some intense firefights were happening on the bottom floor which I was not involved in. When the next enemy wave appears, the first enemy predicts my location incorrectly and sprays at a random corner, when he passes the doorway, I eliminate him and his corpse falls through the ceiling hole. Strangely the other enemy decided to Smoke the doorway, I was not sure what they expected, but I guessed they were acting defensively, and I used a grenade to remove them. At this point bottom floor is controlled by the defenders, so I throw my 2nd frag grenade through the ceiling hole and eliminate another defender clearing the objective. More teammates join to secure the objective quickly.
I was happy as the team listened to the main plan and we successfully executed a coordinated push well that secured the objective (w/ 1 wave left).
Objective C (The Bad)
I’m unsure if our team just got cocky, but I think we played a bit sloppy on this objective. For some reason, my observer went mad and kept running away and dying. I couldn’t even call in any fire support like smoke/chemical which was frustrating.
Leading up to the capture, I threw my 1st grenade down a high-traffic area which got a kill. I was intending to approach the objective from there and would like enemies to not be nearby. The building I was in was chaotic, I sensed that there were enemies above me. I spammed smoke, but I didn’t run immediately, and I suspected the enemy would have been watching for movement initially. I do eventually run and I managed to sneak past the 2 enemies above me. The 2nd frag I throw was an attempt to help clear the objective (no kill). I make it into the objective. Two separate enemies attempt to defend and I manage to eliminate them both and I managed to capture the objective on wave 0, just before the grenade explodes and kills me.
Cache (The Ugly)
Since I died within seconds of capturing ‘C’, I wasn’t eliminated just yet. My Observer was near the objective C area and I doubt he would be alive by the time I would arrive. This is annoying as I would have liked to use lethal fire support to clear the outside, then used smoke mortars for concealment to move closer, and then we could focus on the building and still have not exhausted any equipment.
I enjoy the cache mechanic in Push, and a 0 v 0 wave makes it intense. I decided to flank as time wasn’t an issue and I wanted to secure the map first before approaching the objective as an enemy lurking behind the front line can cause havoc. I manage to get to the flank and start scanning the long lines trying to counter snipe. At this point, one of my concerns came true, an enemy ambushed 2 players from behind near the C objective. I managed to eliminate this troublemaker so I can focus on the main area of the cache. I was very cautious of the left side of the cache as it is a very open line, where if you just sprint across it is easy to get eliminated. I decided to create a small smoke screen so I could get in range to safely throw a frag grenade at the area, which ends up killing a sniper. At this point there is only 1 enemy left, we have 4.
Don’t underestimate a defender in this scenario. At the time, I thought there were 2 enemies left, one in the room with the objective, and one somewhere to the right. I throw my final frag into the cache room in an attempt to eliminate the enemy and damage the objective. My team were being noisy with their footsteps, which I found disruptive as I was trying to listen for the enemy. The enemy successfully eliminated all 3 of my teammates making it a 1v1 for the win. The incoming round and my teammate that died gave me enough information to figure out that he was outside the objective. At this point, I knew I had an advantage if I was patient. The enemy would be paranoid that I would try to destroy the objective so they needed to return to the building/room. I lay prone tight to the window, as the enemy could try entering that way too. The enemy does a glance in and can’t see me, he continues running around, and I eliminate him as he goes towards the cache. We win the game, and I achieve the accolade “Comeback Kid: Won the round as the last one Standing”
Thank you for reading if you made it to the end of the post, I appreciate you spending the time to do so, hopefully, it was informative.
Previous: Burst Mode Rate of Fire